react课程27-身份验证和功能完善
Last updated on October 18, 2024 pm
本节课包含如何利用Auth2.0实现身份验证的功能,以及完善用户的功能。
一、
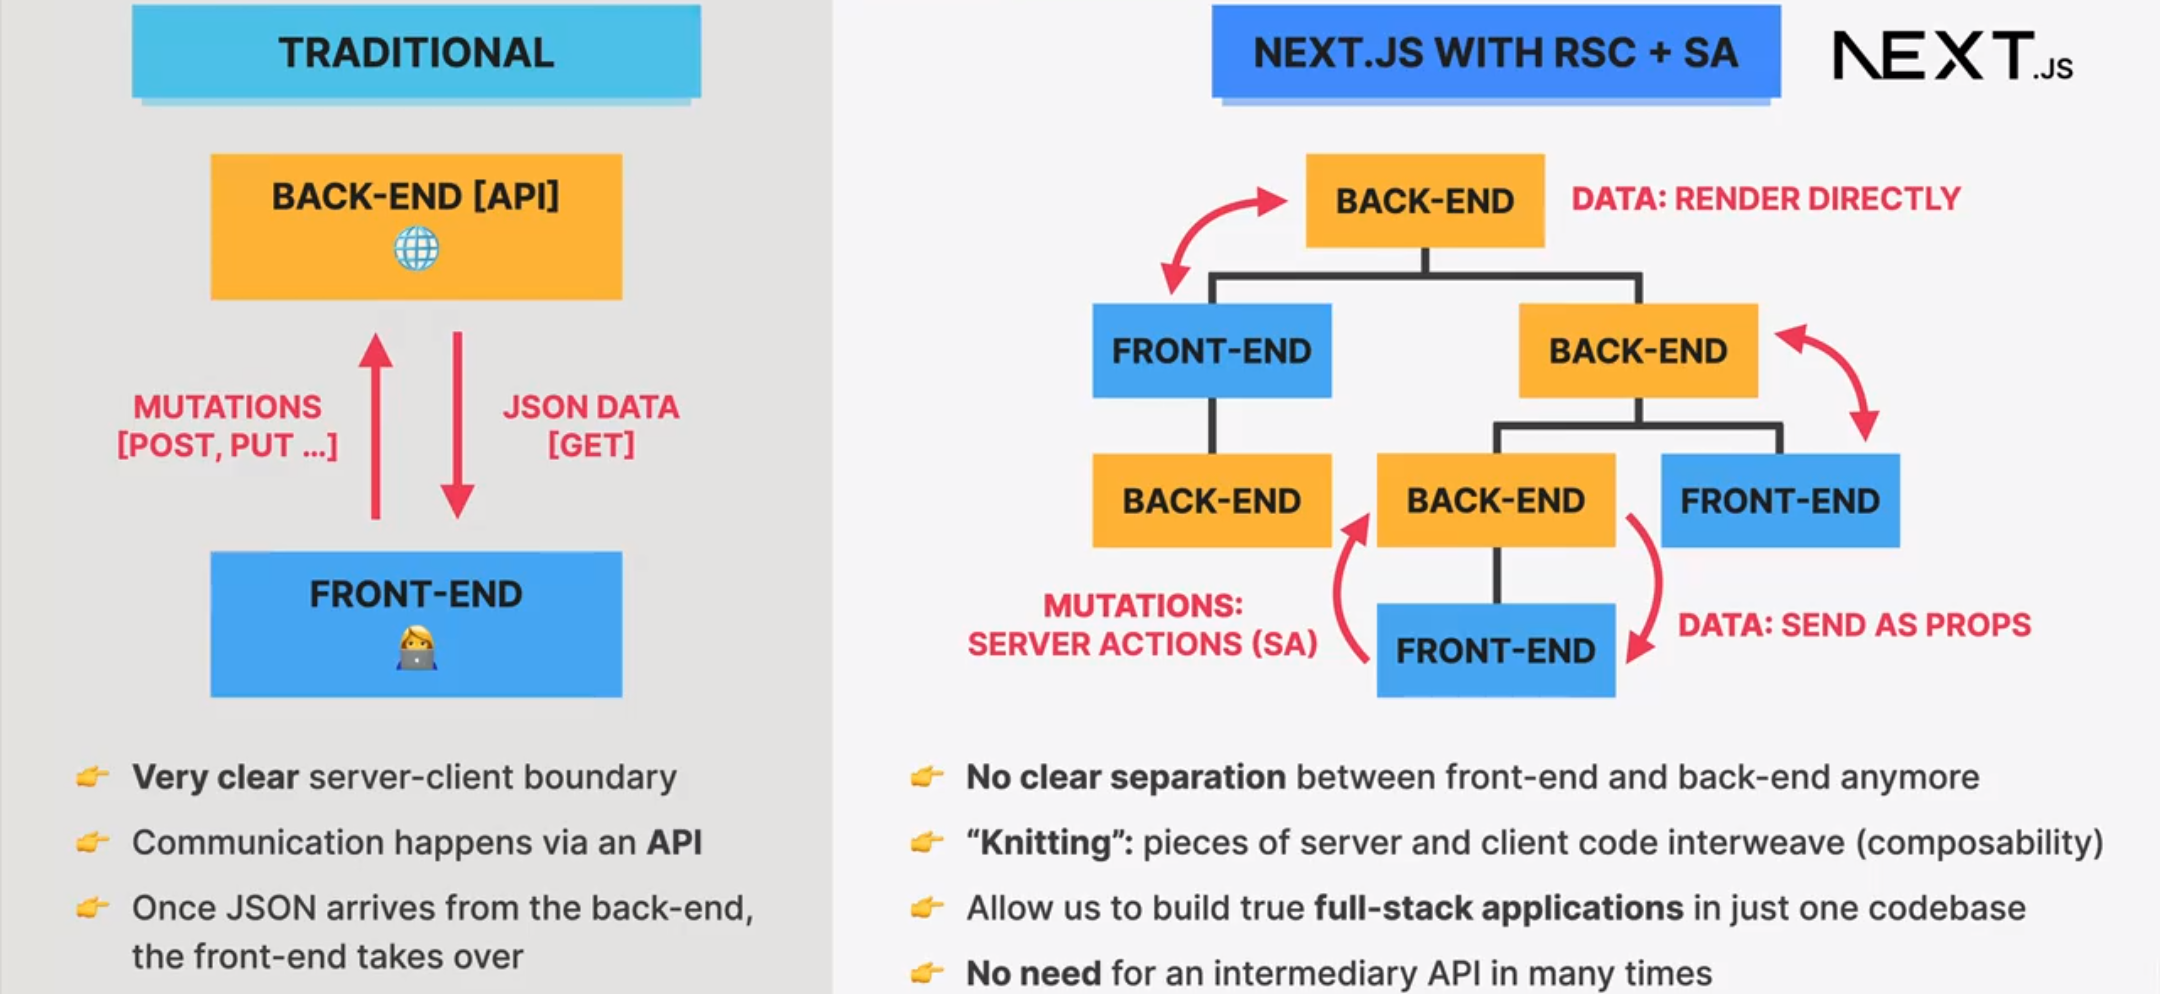
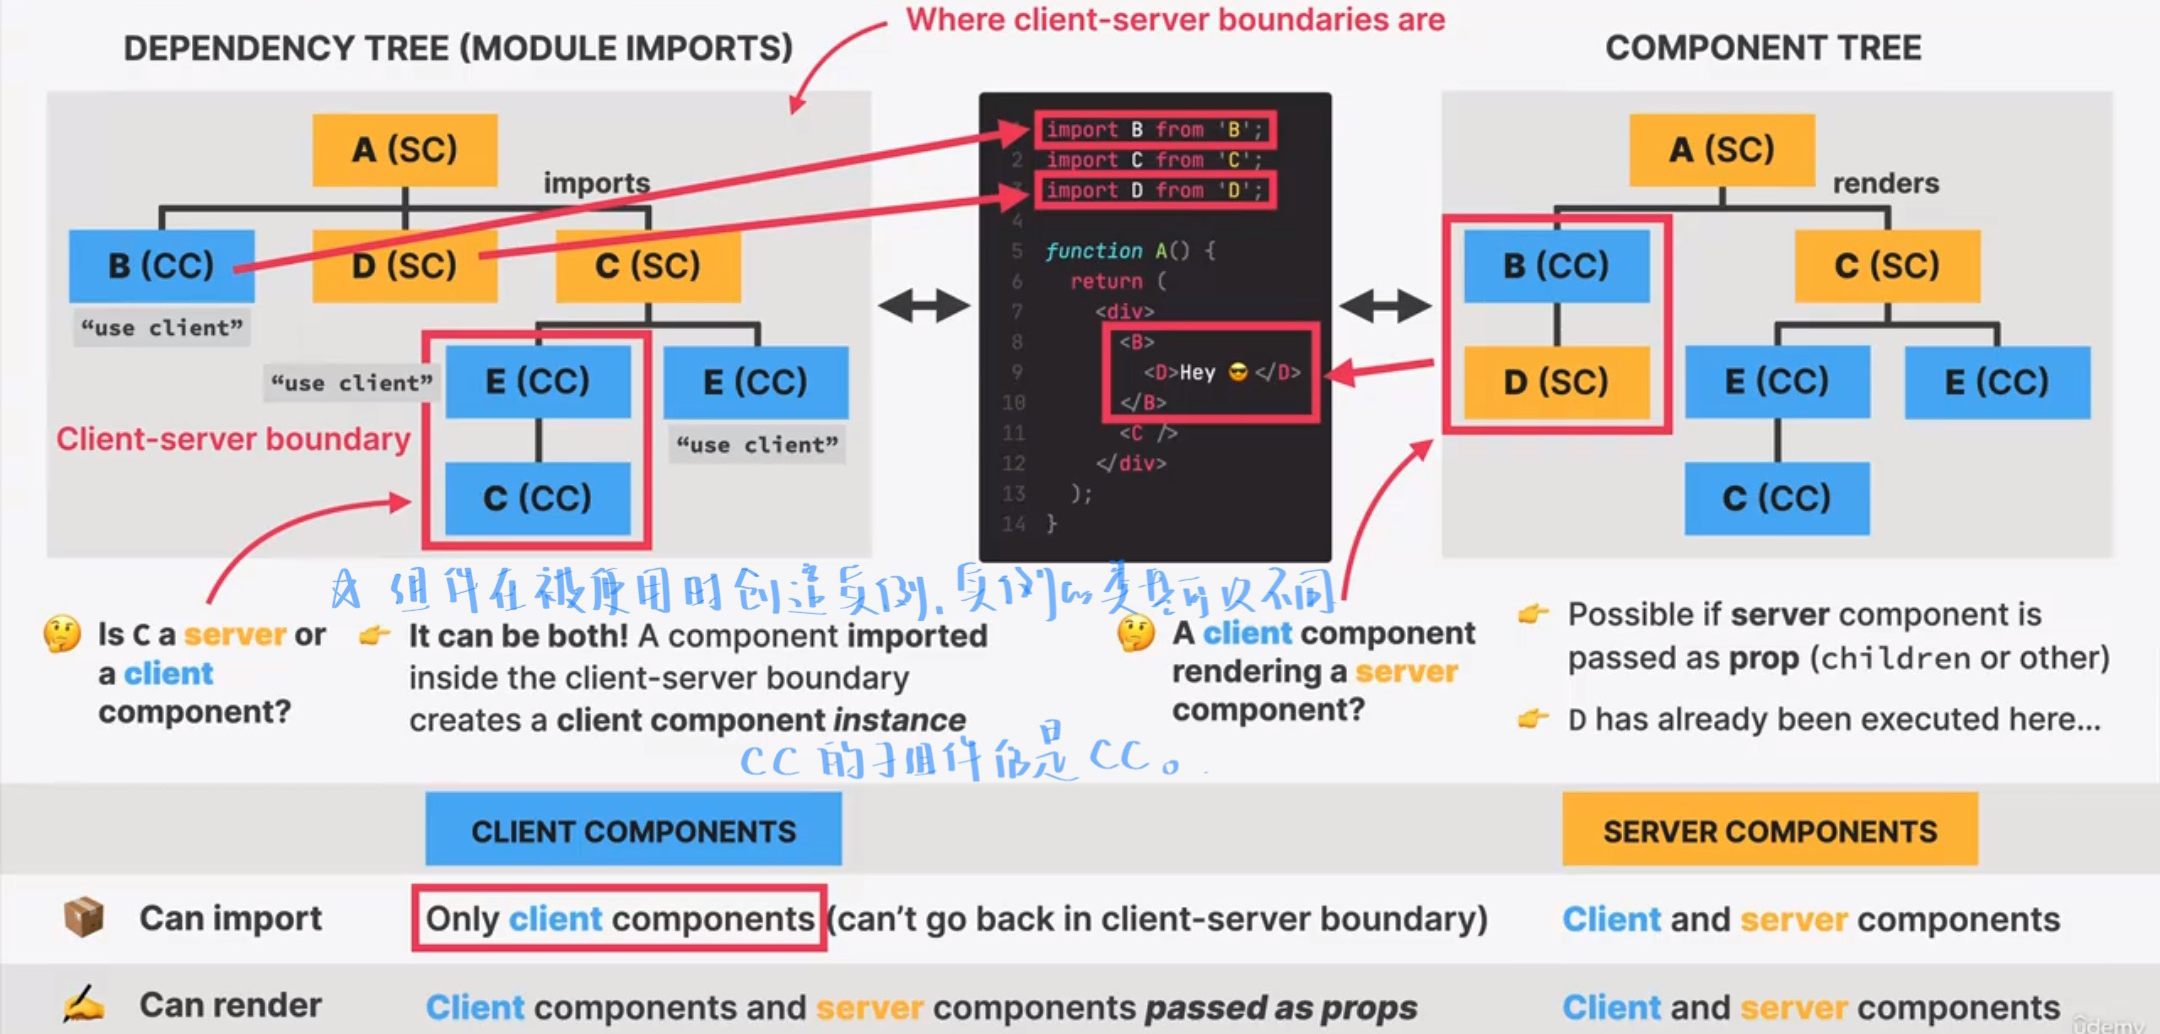
(1)客户端&&服务端VS后端&&前端


二、部分处理
(1)
1、使NavBar被选中链接高亮
找到组件SideNavigation,使用nextjs提供的hook:usePathname
const pathName = usePathname();可以获得当前的路径,于是可以进入条件style模式:
${ pathName === link.href ? 'bg-primary-800' : '' }
✅最重要的是需要声明“use client”
2、提取profile中的表单到client组件
由于表单中用到了setCountry,是一个服务端的组件,如果直接包含在client组件中,就会报错(因为client组件不能import服务端组件)。因此可以在服务端的Profile Page中,将setCountry组件通过children传递过去,就OK了。
(2)建立filter理解如何把状态从client传递到server
通过URL
1、维护服务端
在
app目录下的动态路由文件夹中,Page和layout默认可以接收params,这些params会自动从文件结构中解析传递到组件中,而不需要通过getStaticProps或getServerSideProps
cabins界面通过接收searchParams参数,得到filter数据,传递给CabinList,由此可以条件渲染cabins。此时cabins界面已经成为动态界面,revalidate参数已无用,因为它只适用于静态界面。
2、suspense fallback失效的问题
方法:使用suspense组件时不仅传入fallback,还要传入唯一的可以、值
当 Suspense 组件的 key 发生变化时,React 会将当前挂载的组件卸载并重新渲染。这意味着当 key 改变时,Suspense 内的组件(如 CabinList)会被强制重新加载,即使在同一个 Suspense 中缓存的数据也会被刷新。这对于需要根据某些条件(如 filter)强制刷新内容时非常有用。
3、建立Filter组件
1 | |
❓❓为什么这么复杂
在 Next.js 的 client component 中,useSearchParams() 提供了对 URL 查询参数的访问,但它的返回值是一个 URLSearchParams 对象的只读版本。这意味着你可以使用 useSearchParams() 来获取参数,但不能直接通过它来修改或设置新的查询参数。
❓❓URLSearchParams
这是 JavaScript 标准 URLSearchParams API 的工作方式,与 Next.js 本身无关,创建一个新的 URLSearchParams 实例后,可以自由地添加、修改或删除查询参数,并且将这些修改应用到 URL 中。
❓❓WHY “router.replace”
params.set('capacity', filter) 本身不会自动更新 URL 或切换界面,它只是在内存中修改了一个 URLSearchParams 对象,并没有直接与浏览器的地址栏进行交互,也不会触发页面的重新渲染。
router.replace() 是 Next.js 提供的 API,用来显式更新浏览器的地址栏并影响页面渲染。在不添加新浏览历史记录的情况下替换当前 URL,即页面不会进行完整的刷新,用户点击 “后退” 按钮时也不会回到修改前的 URL。
❓❓{ scroll: false }
常在改变 URL 后,页面会自动滚动到顶部。通过传递 { scroll: false },你可以阻止页面滚动,保持当前的滚动位置不变。这在切换过滤条件或更新查询参数时非常有用,避免页面跳转导致的体验不一致。
(3)create an API endpoint
路径:app\api\cabins\[cabinId]\route.js
内容:
1 | |
访问后:

详细信息:https://developer.mozilla.org/zh-CN/docs/Web/API/Response
三、使用(NEXT)Auth.js进行Authentication
(1)配置环境变量
找到.env.local文件夹,在里面添加两个环境变量
其中我们可以访问https://generate-secret.vercel.app/网址,他会随机生成secret,更加安全
1 | |
(2)google developer console(⚠️配置出问题,换用了Github)
⭕https://authjs.dev/getting-started/providers/google 这是配置的相关网址
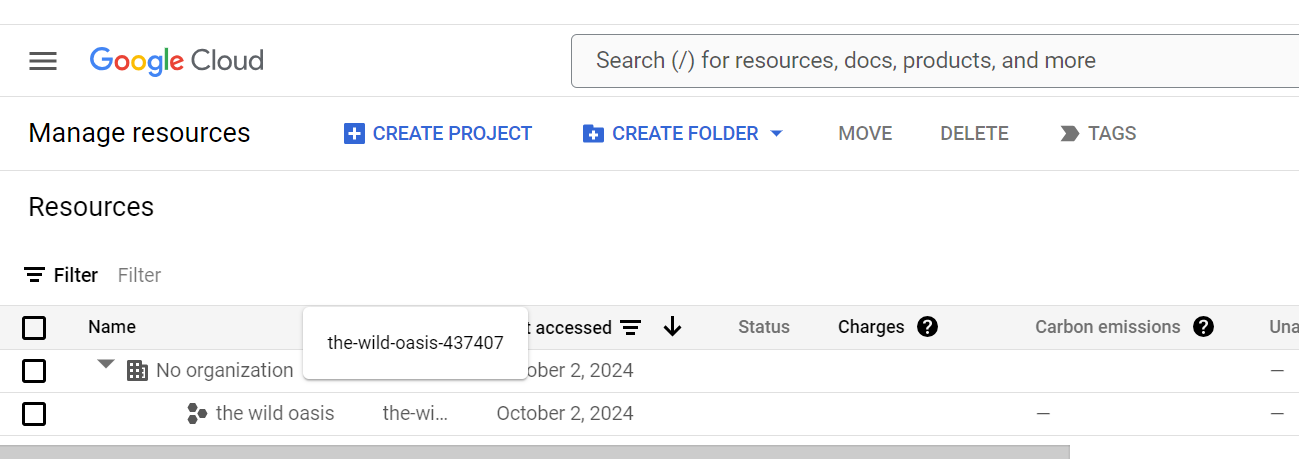
1、创建项目和OAuth consent screen
OAuth 同意屏幕(OAuth consent screen)是 Google Cloud Platform 上的一个配置步骤,用于在用户使用您的应用程序进行身份验证和授权时展示给用户的信息
点击创建项目,然后select it

左侧sideBar选择API&Services,再选择
选择External,因为Internal只对google workspase的用户有效,然后点击create。
第一页Domain部分不用填,第二页不用填,第三页把自己的邮箱或其他想要测试的邮箱添加进去,然后就结束。
2、Credentials
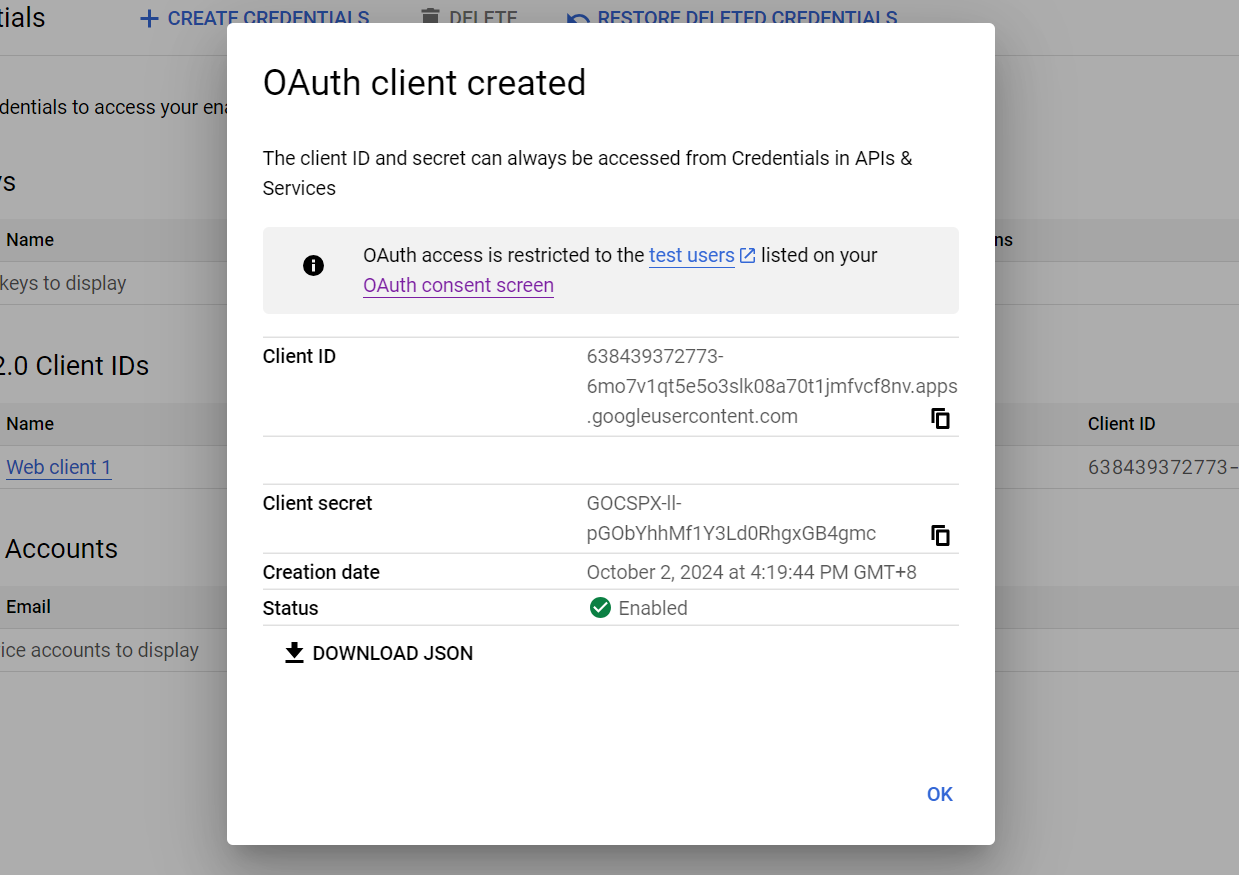
Credentials(凭据) 是一组用于身份验证和授权的安全信息,允许您的应用程序安全地访问 Google AP


弹出的这个界面最好不要立马叉掉!因为需要用上面的值配置环境变量
1 | |

(3)配置Auth.js
天杀的谷歌。。。。。。Github轻轻松松配好,谷歌跟发癫了似的。
⭕npm i next-auth@beta (第五版)
1、配置Auth.js
1 | |
2、api下建auth路径
app\api\auth\[...nextauth]\route.js

localhost:3000/api/auth/providers

3、用户信息
点击上方的按钮用自己的账号Signin后,在组件中使用const session=await auth(),就会得到用户信息
推荐在server端得到用户信息;使用auth()会使整个界面变成动态
1 | |
(4)使用Middleware保护APP路线
⭕在根文件夹下创建middleware.js
auth可以让我们得到当前会话,也可以作为中间件使用。
1、middleware.js
将 auth 作为中间件导出。这个中间件会在请求到达匹配的路径时被调用。
matcher 指定了 /account 路径,只有请求 /account 路径时,才会调用这个中间件
1 | |
2、auth.js
在authConfig中添加callbacks属性:
authorized的作用是决定用户是否被授权访问某个资源。
request: 这是当前的请求对象,包含请求相关的数据(例如 URL、headers 等)。
1 | |
(5)自定义signin和signout界面
1、signin
在app下创建login文件夹,创建page界面(含有文字和自定义的signin按钮)。
在authConfig中添加page属性:signIn:“/login”
❓❓如何把auth.js中导出的signIn功能和按钮连接起来
不能直接添加onClick,因为想保持它是服务器组件。
->在lib中添加action.js,最上方添加“use server”属性,于是可以在下面export一些函数
–>首先是signInAction函数
1 | |
—>将Button组件用form包裹起来,添加action={signInAction}
2、signout
signout按钮是客户端组件,但是仍旧可以按照上面的办法,添加action属性。
(6)为登陆的新用户创建supabase信息
在callback中加入:
首先在signIn之后执行创建用户的函数,创建之后再执行,将创建出来的guestId赋给session中,这样可以获得身份的凭据。
1 | |
四、为用户添加动作
(1)更新信息
仍旧是在表单中采用action关键字,相应的函数会自动接收表中数据。
1 | |
->💭1解决cache问题(revalidatePath)
动态界面自动刷新的时间是30s
1 | |
在 Next.js 中,revalidatePath 是一个用于手动触发路径重新验证的函数,通常在你需要在服务器端更新某个页面或 API 的缓存时使用。该函数常用于在进行数据更改后,让 Next.js 知道该路径的数据已过期并需要重新加载。
->💭2呈现加载状态
const { pending } = useFormStatus();
这个组件必须在自己被包含到form组件中才能使用。(不太懂)
所以把表单的按钮提取成了一个单独的组件,在其中得到pending状态并条件渲染(按钮的文字和disabled),然后再把这个Button放置入form中,就可以得到form的状态了。
(2)删除预定
->💭1构建Reservation界面
(为什么不先实现创建预定,难道是太难了)
给自己的id添加点预定展示界面。过去的booking不能修改和删除。
1 | |
⚠️中间的几行代码是因为,如果我们打开网络请求录制,在自己的界面删除一个预定,然后选择复制这个删除预定的请求为cURL,粘贴到终端,只需要修改一下里面的bookingId,就可以删除所有人的booking了。
这一次调用服务端action是通过在button上添加onClick属性。
->💭2呈现加载状态2️⃣(useTransition)
由于这次是按钮,所以不能用useFormStatus来显示loading状态了。
useTransition 是 React 18 引入的一个 Hook,用于处理“并发渲染”中的非紧急更新。这允许你将某些状态更新标记为非紧急的,从而不会阻塞用户界面的交互。useTransition 可以帮助避免在状态更新期间卡顿的情况,例如加载新数据或页面内容时
useTransition 返回两个值:
isPending:表示更新是否正在进行中。startTransition:用于将更新标记为“非紧急”的函数。
1 | |
如果用户确认删除,startTransition 被调用,删除操作 (deleteReservation) 被封装在 startTransition 中,意味着这是一个非紧急的更新操作,不会阻塞页面的其他操作。
(3)修改预定
当我们点击Edit的时候,会将我们定向到(http://localhost:3000/account/reservations/edit/bookingId)界面。
所以首先要做的就是先创建一个动态的Route。
1 | |
(4)useOptimistic
我们想在预定界面使用这个hook
useOptimistic 是 React 18 中提供的一个 Hook,用于实现 乐观更新(Optimistic UI)。乐观更新是指在后台数据更新(如网络请求)尚未完成时,先更新用户界面,使其看起来好像数据已经更新成功了,而后台的实际更新在完成后再同步数据状态。这种方式可以提高用户体验,减少界面的延迟感。如果有错误,那么状态会回滚到操作前。
首先把Reservation提取出来到ReservationList组件中,好在这里使用hook(“use client”不要忘记)。
然后我们在这里重构(乐观化)deleteReservation函数,并传递给删除预定的组件中去。
1、初始化状态
optimisticBookings:这是一个包含当前乐观状态下的预订列表的变量,它会在每次删除操作后立即更新。
optimisticDelete:这是一个用于更新乐观状态的函数,当用户触发删除时,调用该函数会立即更新界面。
1 | |
初始状态 bookings:这是从父组件传递过来的预订列表。
更新函数:该函数用于更新预订列表。每当删除操作触发时,它会将 bookingId 传入,过滤掉与这个 id 对应的预订项,从而在 UI 上立即移除它。
2、删除函数
1 | |
**optimisticDelete(bookingId)**:这行代码会立即从 optimisticBookings 列表中删除指定的 bookingId,从而让用户界面上立刻反映删除的结果。
**deleteReservation(bookingId)**:该函数发出实际的删除请求,通常是向后端 API 发送 DELETE 请求,删除指定的预订项。
3、最后
将原本map的bookings改为optimisticBookings
(5)创建预定
Object.entries(formData.entries)
1 | |
五、一些疑问
(1)什么叫做next.js中所有的navigation都被包装成了transitions
在 Next.js 13 及以上版本中,所有的页面导航都被包装成了“transitions”。这意味着当你在 Next.js 应用中进行页面导航时,React 自动将这些导航操作处理为并发渲染的过渡(concurrent transitions)。这种方式可以优化用户体验,使得页面导航更加流畅,尤其是在加载新页面内容时,避免了卡顿或延迟。
1、什么是 Transition?
Transition 是 React 18 引入的并发特性之一,它允许某些状态更新标记为“非紧急”,从而不会阻塞 UI 的响应。与传统的同步渲染不同,React 可以在处理某些状态变化时,让其他更紧急的 UI 更新(例如用户输入或按钮点击)优先执行。
在 Next.js 中,当页面切换(例如从 /home 导航到 /about)时,这种页面导航会被包装成 Transition,意味着 React 可以在后台处理页面加载,同时保持用户界面的交互顺畅。
2、为什么 Next.js 包装导航为 Transition?
- 提高页面导航的流畅性:当你从一个页面导航到另一个页面时,React 会将页面的加载过程作为一个 transition。这样,即使后台正在加载新页面,前台的用户界面(如加载指示器、按钮等)仍然可以继续响应用户输入,而不会因为页面加载导致整个应用的阻塞或卡顿。
- 避免导航时的卡顿:如果导航过程中有大量的数据获取或计算,传统的同步渲染可能导致整个应用变得不响应。而通过将导航包装为 transition,React 可以将这些非紧急的任务推迟处理,从而优先处理紧急的 UI 更新。
- 更优的用户体验:包装成 transition 后,Next.js 可以更好地管理异步操作(如数据获取、组件加载等),确保页面切换时不会阻塞用户的交互。
具体场景举例
假设你有一个 Next.js 应用,当你从一个页面导航到另一个页面时:
- 传统同步渲染:页面导航会在新页面完全加载完毕之前阻塞用户的其他操作。这可能导致短暂的“白屏”或 UI 不响应的现象。
- 使用 Transition:当页面正在加载时,React 可以继续处理其他用户交互(比如点击按钮、输入文本),而后台的页面加载则被标记为非紧急的,并逐步完成。这种方式确保了页面导航更加流畅。